Adding A Custom Dropdown in RCDC for Forefront Identity Manager 2010
Posted
by Daniel Lackey
on Geeks with Blogs
See other posts from Geeks with Blogs
or by Daniel Lackey
Published on Thu, 25 Mar 2010 20:00:52 GMT
Indexed on
2010/03/25
20:13 UTC
Read the original article
Hit count: 1526
My latest exploration has been FIM 2010 for Identity Management. The following is a post of how to add a custom dropdown for the FIM Portal. I have decided to document this as I cannot find documentation on how to do this anywhere else. I hope that it finds useful to others.
For starters, this was to me not an easy task to figure out. I really would like to know why it is so cumbersome to do something that seems like a lot of people would need to do, but that’s for another day J
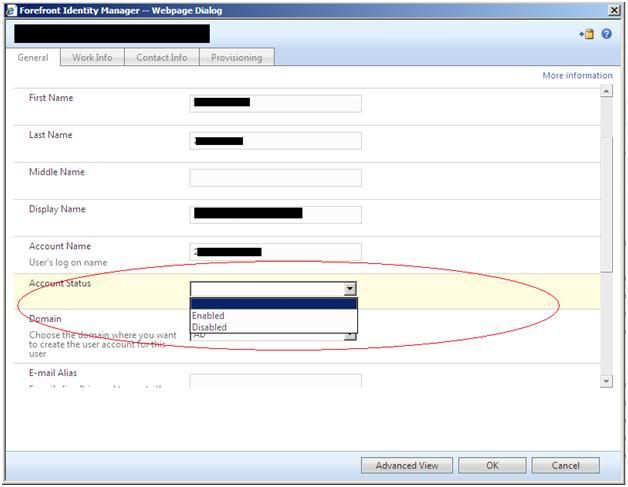
The dropdown I wanted to add was for ‘Account Status’ which would display if the account is ‘Enabled’ or ‘Disabled’ in the data source Active Directory. This option would also allow helpdesk users or admins to administer the userAccountControl attribute in AD from the FIM Portal interface.
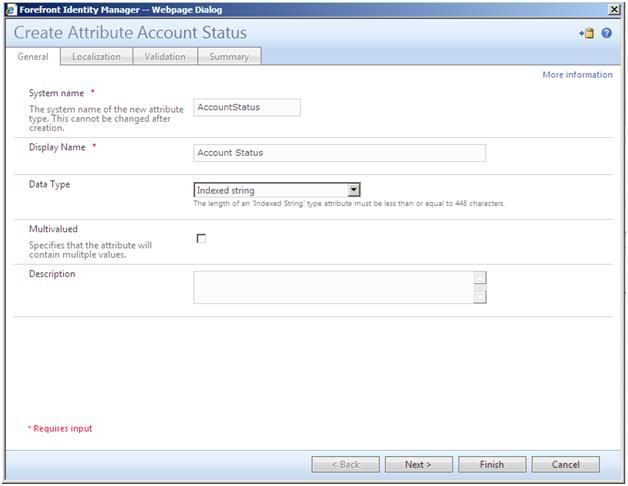
The first thing I had to do was create the attribute itself. This is done by going to Administration à Schema Management from the FIM 2010 portal. Once here, you click on All Attributes. What is listed here are all attributes and their associated Resource Types in FIM. To create the ‘AccountStatus’ attribute, click on New. As shown below, enter ‘AccountStatus’ with no spaces for the System Name and ‘Account Status’ for the Display Name. The Data Type is going to be ‘Indexed String’. Click Next.
Leave everything on the Localization tab default and click Next.
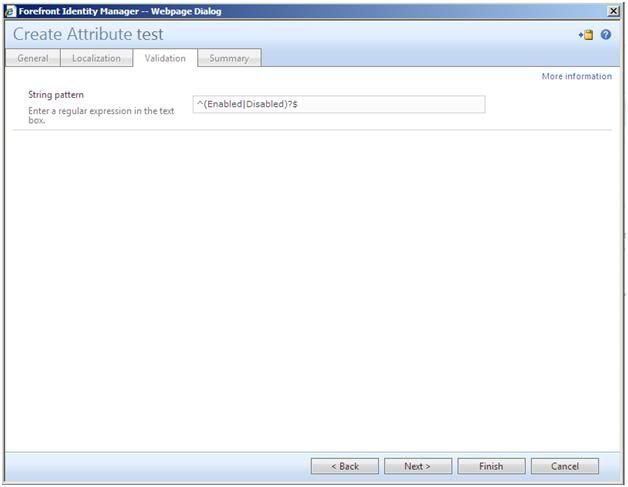
On the Validation tab as shown below, we will enter the regex expression ^(Enabled|Disabled)?$ with our two desired string values ‘Enabled’ and ‘Disabled’. Click on Finish and then and Submit to complete adding the attribute.
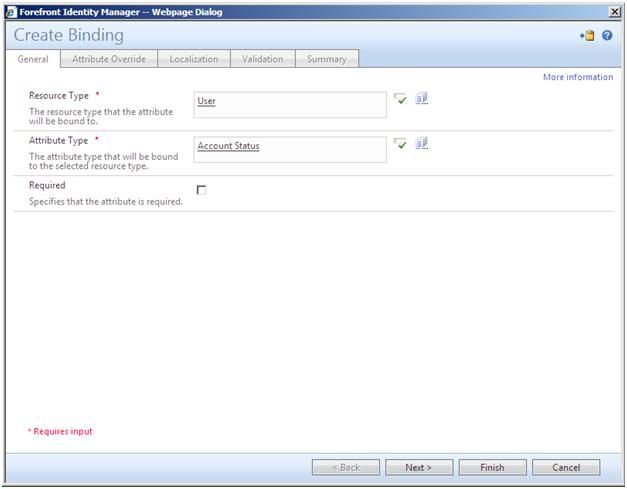
The next step involves associating the attribute with a resource type. This is called ‘Binding’ the attribute. From the Schema Management page, click on All Bindings. From the page that comes up, click on New. As shown below, enter ‘User’ for the Resource Type and ‘Account Status’ for the Attribute Type. This is essentially binding the Account Status attribute to the ‘User’ Resource Type. Click Next.
On the ‘Attribute Override’ tab, type in ‘Account Status’ for the Display Name field. Click Next.
On the ‘Localization’ tab, click Next.
On the ‘Validation’ tab, enter the regex expression ^(Enabled|Disabled)?$ we entered previously for the attribute. Click Finish and then Submit to complete.
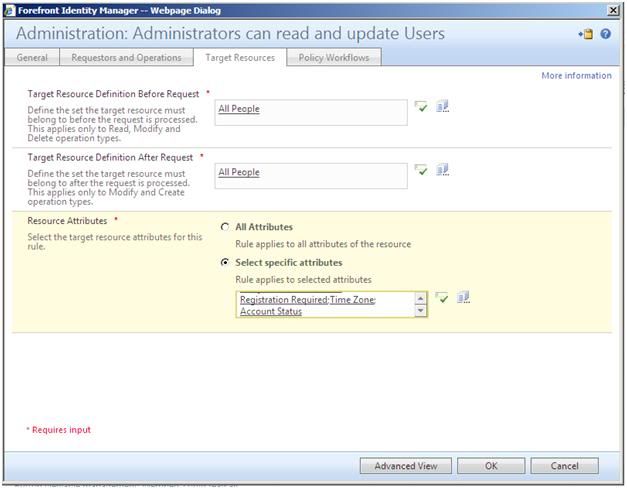
Now that the Attribute and the Binding are complete, you have to give users permission to see the attribute on the User Edit page. Go to Administration à Management Policy Rules. Look for the rule named Administration: Administrators can read and update Users and click on it. Once it opens, click on the ‘Target Resources’ tab and look at the section named Resource Attributes. Type in at the end the ‘Account Status’ attribute and check it with the validator. Once done click on OK to save the changes.
Lastly, we need to add the actual dropdown control to the RCDC (Resource Control Display Configuration) for User Editing. Go to Administration à Resource Control Display Configuration. From here navigate until you find the RCDC named Configuration for User Editing RCDC and click on it. The following is what you will see:
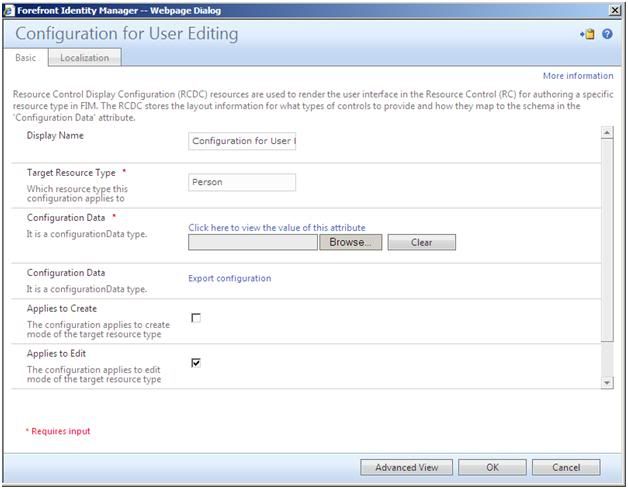
First step is to export the Configuration Data file. Click on the Export configuration link and save the file to your desktop of other folder.
Find the file you just exported and open the file in your XML editor of choice. I use notepad but anything will work. Since we are adding a dropdown control, first find another control in the existing file that is already a dropdown in FIM. I used EmployeeType as my example. Copy the control from the beginning tag named <my:Control… to the ending tag </my:Control>. Now take what you copied and paste it in whatever location you desire within the form between two other controls. I chose to place the ‘Account Status’ field after the ‘Account Name’ field. After you paste the control you will need to modify so it looks like this:
Notice where you specify what attribute you are dealing with where it has AccountStatus in the XML. Once you are complete with modifying this, save the file and make sure it is a .xml file.
Now go back to the Configuration for User Editing screen and look at the section named ‘Configuration Data’. Click the ‘Browse’ button and find the XML file you just modified and choose it. Click OK on the bottom of the window and you are done!
Now when you click on a user’s name in the FIM Portal, you should see the newly added dropdown box as below:
Later I will post more about this drop down, specifically on how to automate actually ‘Disabling’ the account in the data source through the FIM Workflows and MAs.
<my:Control my:Name="AccountStatus" my:TypeName="UocDropDownList" my:Caption="{Binding Source=schema, Path=AccountStatus.DisplayName}" my:Description="{Binding Source=schema, Path=AccountStatus.Description}"  my:RightsLevel="{Binding Source=rights, Path=AccountStatus}">

        <my:Properties>

          <my:Property my:Name="ValuePath" my:Value="Value"/>

          <my:Property my:Name="CaptionPath" my:Value="Caption"/>

          <my:Property my:Name="HintPath" my:Value="Hint"/>

          <my:Property my:Name="ItemSource" my:Value="{Binding Source=schema, Path=AccountStatus.LocalizedAllowedValues}"/>

          <my:Property my:Name="SelectedValue" my:Value="{Binding Source=object, Path=AccountStatus, Mode=TwoWay}"/>

        </my:Properties>

      </my:Control>
© Geeks with Blogs or respective owner