Raspberry Pi entrance signed backed by Umbraco - Part 1
Posted
by
Chris Houston
on Vizioz Umbraco Blog
See other posts from Vizioz Umbraco Blog
or by Chris Houston
Published on 2014-02-03T05:22:00.002-08:00
Indexed on
2014/05/26
21:58 UTC
Read the original article
Hit count: 1190
Filed under:
Raspberry Pi
|Umbraco CMS
- Raspberry Pi
- Umbraco CMS
- Automatic updates
- Automated monitor of the sign
- Power saving when the screen is not in use
Mounting the screen
The screen that has been used is a standard LED low energy Full HD screen and has been mounted on the wall using it's VESA mounting points, as the wall is a stud wall we were able to add an access panel behind the screen to feed through the mains, HDMI and sensor cables.
The Raspberry Pi is then tucked away out of sight in the main electrical cupboard which just happens to be next to the sign, we had an electrician add a power point inside this cupboard to allow us to power the screen and the Raspberry Pi.
Designing the interface and editing the content
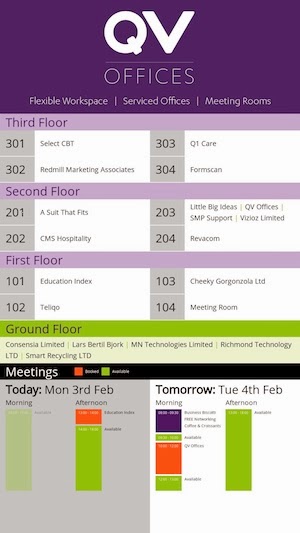
Although a room sign was the initial requirement from QV Offices, their medium term goal has always been to add online meeting booking to their website and hence we suggested adding information about the current and next day's meetings to the sign that would be pulled directly from their online booking system.
We produced the design and built the web page to fit exactly on a 1920 x 1080 screen (Full HD in Portrait)
As you would expect all the information can be edited via an Umbraco CMS, they are able to add floors, rooms, clients and virtual clients as well as add meeting bookings to their meeting diary.
As you would expect all the information can be edited via an Umbraco CMS, they are able to add floors, rooms, clients and virtual clients as well as add meeting bookings to their meeting diary.
How we configured the Raspberry Pi
After receiving a new Raspberry Pi we downloaded the latest release of Raspbian operating system and followed the official guide which shows how to copy the OS onto an SD card from a Mac, we then followed the majority of steps on this useful guide: 10 Things to Do After Buying a Raspberry Pi.
Installing Chromium
We chose to use the Chromium web browser which for those who do not know is the open sourced version of Google Chrome. You can install this from the terminal with the following command:
sudo apt-get install chromium-browserInstalling Unclutter
We found this little application which automatically hides the mouse pointer, it is used in the script below and is installed using the following command:
sudo apt-get install unclutterAuto start Chromium and disabling the screen saver, power saving and mouse
When the Raspberry Pi has been installed it will not have a keyboard or mouse and hence if their was a power cut we needed it to always boot and re-loaded Chromium with the correct URL.
Our preferred command line text editor is Nano and I have assumed you know how to use this editor or will be able to work it out pretty quickly.
So using the following command:
sudo nano /etc/xdg/lxsession/LXDE/autostartWe then changed the autostart file content to:
@lxpanel --profile LXDE

@pcmanfm --desktop --profile LXDE

@xscreensaver -no-splash

@xset s off

@xset -dpms

@xset s noblank

@chromium --kiosk --incognito http://www.qvoffices.com/someURL

@unclutter -idle 0
The first few commands turn off the screen saver and power saving, we then open Cromium in Kiosk Mode (full screen with no menu etc) and pass in the URL to use (I have changed the URL in this example) We found a useful blog post with the Cromium command line switches.
Finally we also open an application called Unclutter which auto hides the mouse after 0 seconds, so you will never see a mouse on the sign.
We also had to edit the following file:
sudo nano /etc/lightdm/lightdm.confAnd added the following line under the [SeatDefault] section:
xserver-command=X -s 0 dpms
Refreshing the screen
We decided to try and add a scheduled task that would trigger Chromium to reload the page, at some point in the future we might well change this to using Javascript to update the content, but for now this works fine.
First we installed the XDOTool which enables you to script Keyboard commands:
sudo apt-get install xdotool
We used the Refreshing Chromium Browser by Shell Script post as a reference and created the following shell script (which we called refreshing.sh):
export DISPLAY=":0"WID=$(xdotool search --onlyvisible --class chromium|head -1)xdotool windowactivate ${WID}xdotool key ctrl+F5
This selects the correct display and then sends a CTRL + F5 to refresh Chromium.
You will need to give this file execute permissions:
chmod a=rwx refreshing.sh
Now we have the script file setup we just need to schedule it to call this script periodically which is done by using Crontab, to edit this you use the following command:
crontab -eAnd we added the following:
*/5 * * * * DISPLAY=":.0" /home/pi/scripts/refreshing.sh >/home/pi/cronlog.log 2>&1This calls our script every 5 minutes to refresh the display and it logs any errors to the cronlog.log file.
Summary
QV Offices now have a richer and more manageable booking system than they did before we started, and a great new sign to boot.
How could we make sure that the sign was running smoothly downstairs in a busy office centre? A second post will follow outlining exactly how Vizioz enabled QV Offices to monitor their sign simply and remotely, from the comfort of their desks.
© Vizioz Umbraco Blog or respective owner