Running ASP.NET Webforms and ASP.NET MVC side by side
Posted
by rajbk
on ASP.net Weblogs
See other posts from ASP.net Weblogs
or by rajbk
Published on Tue, 11 May 2010 10:10:45 GMT
Indexed on
2010/05/11
10:14 UTC
Read the original article
Hit count: 1572
One of the nice things about ASP.NET MVC and its older brother ASP.NET WebForms is that they are both built on top of the ASP.NET runtime environment. The advantage of this is that, you can still run them side by side even though MVC and WebForms are different frameworks.
Another point to note is that with the release of the ASP.NET routing in .NET 3.5 SP1, we are able to create SEO friendly URLs that do not map to specific files on disk. The routing is part of the core runtime environment and therefore can be used by both WebForms and MVC.
To run both frameworks side by side, we could easily create a separate folder in your MVC project for all our WebForm files and be good to go. What this post shows you instead, is how to have an MVC application with WebForm pages that both use a common master page and common routing for SEO friendly URLs.
A sample project that shows WebForms and MVC running side by side is attached at the bottom of this post.
So why would we want to run WebForms and MVC in the same project?
WebForms come with a lot of nice server controls that provide a lot of functionality. One example is the ReportViewer control. Using this control and client report definition files (RDLC), we can create rich interactive reports (with charting controls). I show you how to use the ReportViewer control in a WebForm project here : Creating an ASP.NET report using Visual Studio 2010. We can create even more advanced reports by using SQL reporting services that can also be rendered by the ReportViewer control.
Now, consider the sample MVC application I blogged about called ASP.NET MVC Paging/Sorting/Filtering using the MVCContrib Grid and Pager. Assume you were given the requirement to add a UI to the MVC application where users could interact with a report and be given the option to export the report to Excel, PDF or Word. How do you go about doing it?
This is a perfect scenario to use the ReportViewer control and RDLCs. As you saw in the post on creating the ASP.NET report, the ReportViewer control is a Web Control and is designed to be run in a WebForm project with dependencies on, amongst others, a ScriptManager control and the beloved Viewstate. 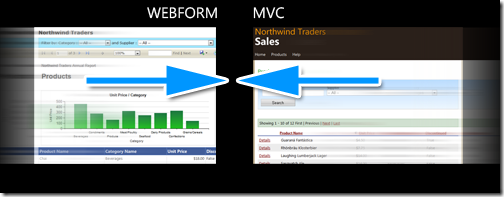
Since MVC and WebForm both run under the same runtime, the easiest thing to is to add the WebForm application files (index.aspx, rdlc, related class files) into our MVC project. You can copy the files over from the WebForm project into the MVC project.
Create a new folder in our MVC application called CommonReports. Add the index.aspx and rdlc file from the Webform project

Right click on the Index.aspx file and convert it to a web application. This will add the index.aspx.designer.cs file (this step is not required if you are manually adding a WebForm aspx file into the MVC project). 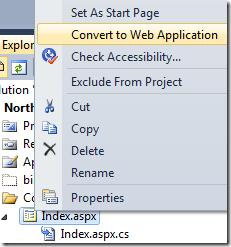
Verify that all the type names for the ObjectDataSources in code behind to point to the correct ProductRepository and fix any compiler errors. Right click on Index.aspx and select “View in browser”. You should see a screen like the one below:
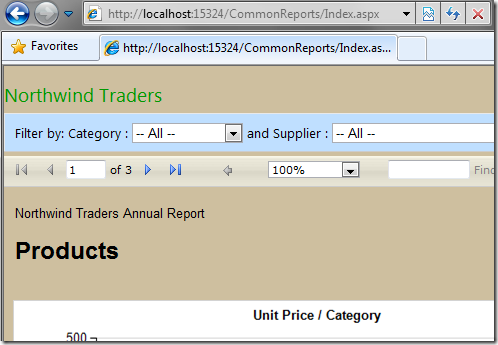
There are two issues with our page. It does not use our site master page and the URL is not SEO friendly.
Common Master Page
The easiest way to use master pages with both MVC and WebForm pages is to have a common master page that each inherits from as shown below.
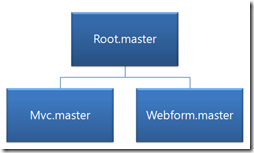
The reason for this is most WebForm controls require them to be inside a Form control and require ControlState or ViewState. ViewMasterPages used in MVC, on the other hand, are designed to be used with content pages that derive from ViewPage with Viewstate turned off. By having a separate master page for MVC and WebForm that inherit from the Root master page,, we can set properties that are specific to each. For example, in the Webform master, we can turn on ViewState, add a form tag etc.
Another point worth noting is that if you set a WebForm page to use a MVC site master page, you may run into errors like the following:
A ViewMasterPage can be used only with content pages that derive from ViewPage or ViewPage<TViewItem>
or
Control 'MainContent_MyButton' of type 'Button' must be placed inside a form tag with runat=server.
Since the ViewMasterPage inherits from MasterPage as seen below, we make our Root.master inherit from MasterPage, MVC.master inherit from ViewMasterPage and Webform.master inherits from MasterPage. 
We define the attributes on the master pages like so:
- Root.master
<%@ Master Inherits="System.Web.UI.MasterPage" … %> - MVC.master
<%@ Master MasterPageFile="~/Views/Shared/Root.Master" Inherits="System.Web.Mvc.ViewMasterPage" … %> - WebForm.master
<%@ Master MasterPageFile="~/Views/Shared/Root.Master" Inherits="NorthwindSales.Views.Shared.Webform" %>
Code behind:
public partial class Webform : System.Web.UI.MasterPage {}
We make changes to our reports aspx file to use the Webform.master. See the source of the master pages in the sample project for a better understanding of how they are connected.
SEO friendly links
We want to create SEO friendly links that point to our report. A request to /Reports/Products should render the report located in ~/CommonReports/Products.aspx. Simillarly to support future reports, a request to /Reports/Sales should render a report in ~/CommonReports/Sales.aspx.
Lets start by renaming our index.aspx file to Products.aspx to be consistent with our routing criteria above.
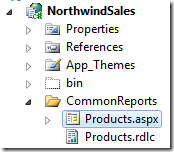
As mentioned earlier, since routing is part of the core runtime environment, we ca easily create a custom route for our reports by adding an entry in Global.asax.
public static void RegisterRoutes(RouteCollection routes)
{
routes.IgnoreRoute("{resource}.axd/{*pathInfo}");
//Custom route for reports
routes.MapPageRoute(
"ReportRoute", // Route name
"Reports/{reportname}", // URL
"~/CommonReports/{reportname}.aspx" // File
);
routes.MapRoute(
"Default", // Route name
"{controller}/{action}/{id}", // URL with parameters
new
{
controller = "Home",
action = "Index",
id = UrlParameter.Optional
} // Parameter defaults
);
}
With our custom route in place, a request to Reports/Employees will render the page at ~/CommonReports/Employees.aspx. We make this custom route the first entry since the routing system walks the table from top to bottom, and the first route to match wins. Note that it is highly recommended that you write unit tests for your routes to ensure that the mappings you defined are correct.
Common Menu Structure
The master page in our original MVC project had a menu structure like so:
<ul id="menu">
<li>
<%=Html.ActionLink("Home", "Index", "Home") %></li>
<li>
<%=Html.ActionLink("Products", "Index", "Products") %></li>
<li>
<%=Html.ActionLink("Help", "Help", "Home") %></li>
</ul>
We want this menu structure to be common to all pages/views and hence should reside in Root.master. Unfortunately the Html.ActionLink helpers will not work since Root.master inherits from MasterPage which does not have the helper methods available.
The quickest way to resolve this issue is to use RouteUrl expressions. Using RouteUrl expressions, we can programmatically generate URLs that are based on route definitions. By specifying parameter values and a route name if required, we get back a URL string that corresponds to a matching route.
We move our menu structure to Root.master and change it to use RouteUrl expressions:
<ul id="menu">
<li>
<asp:HyperLink ID="hypHome" runat="server" NavigateUrl="<%$RouteUrl:routename=default,controller=home,action=index%>">Home</asp:HyperLink></li>
<li>
<asp:HyperLink ID="hypProducts" runat="server" NavigateUrl="<%$RouteUrl:routename=default,controller=products,action=index%>">Products</asp:HyperLink></li>
<li>
<asp:HyperLink ID="hypReport" runat="server" NavigateUrl="<%$RouteUrl:routename=ReportRoute,reportname=products%>">Product Report</asp:HyperLink></li>
<li>
<asp:HyperLink ID="hypHelp" runat="server" NavigateUrl="<%$RouteUrl:routename=default,controller=home,action=help%>">Help</asp:HyperLink></li>
</ul>
We are done adding the common navigation to our application.
The application now uses a common theme, routing and navigation structure.
Conclusion
We have seen how to do the following through this post
- Add a WebForm page from a WebForm project to an existing ASP.NET MVC application
- Use a common master page for both WebForm and MVC pages
- Use routing for SEO friendly links
- Use a common menu structure for both WebForm and MVC.
The sample project is attached below.
Version: VS 2010 RTM
Remember to change your connection string to point to your Northwind database
© ASP.net Weblogs or respective owner