Creating a Reverse Proxy with URL Rewrite for IIS
Posted
by OWScott
on ASP.net Weblogs
See other posts from ASP.net Weblogs
or by OWScott
Published on Thu, 24 Oct 2013 16:18:32 GMT
Indexed on
2013/10/24
21:55 UTC
Read the original article
Hit count: 639
There are times when you need to reverse proxy through a server. The most common example is when you have an internal web server that isn’t exposed to the internet, and you have a public web server accessible to the internet. If you want to serve up traffic from the internal web server, you can do this through the public web server by creating a tunnel (aka reverse proxy).
Essentially, you can front the internal web server with a friendly URL, even hiding custom ports.
For example, consider an internal web server with a URL of http://10.10.0.50:8111. You can make that available through a public URL like http://tools.mysite.com/ as seen in the following image. The URL can be made public or it can be used for your internal staff and have it password protected and/or locked down by IP address.
This is easy to do with URL Rewrite and IIS. You will also need Application Request Routing (ARR) installed even though for a simple reverse proxy you won’t use most of ARR’s functionality. If you don’t already have URL Rewrite and ARR installed you can do so easily with the Web Platform Installer.
A lot can be said about reverse proxies and many different situations and ways to route the traffic and handle different URL patterns. However, my goal here is to get you up and going in the easiest way possible. Then you can dig in deeper after you get the base configuration in place.
URL Rewrite makes a reverse proxy very easy to set up. Note that the URL Rewrite Add Rules template doesn’t include Reverse Proxy at the server level. That’s not to say that you can’t create a server-level reverse proxy, but the URL Rewrite rules template doesn’t help you with that.
Getting Started
First you must create a website on your public web server that has the public bindings that you need. Alternately, you can use an existing site and route using conditions for certain traffic.
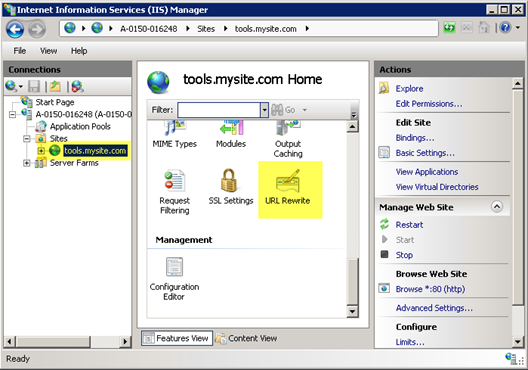
After you’ve created your site then open up URL Rewrite at the site level.
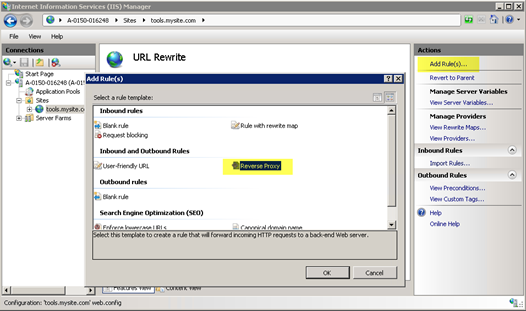
Using the “Add Rule(s)…” template that is opened from the right-hand actions pane, create a new Reverse Proxy rule.
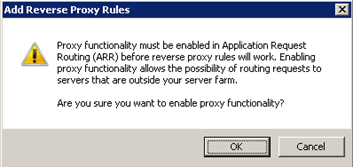
If you receive a prompt (the first time) that the proxy functionality needs to be enabled, select OK. This is telling you that a proxy can route traffic outside of your web server, which happens to be our goal in this case. Be aware that reverse proxy rules can be dangerous if you open sites from inside you network to the world, so just be aware of what you’re doing and why.
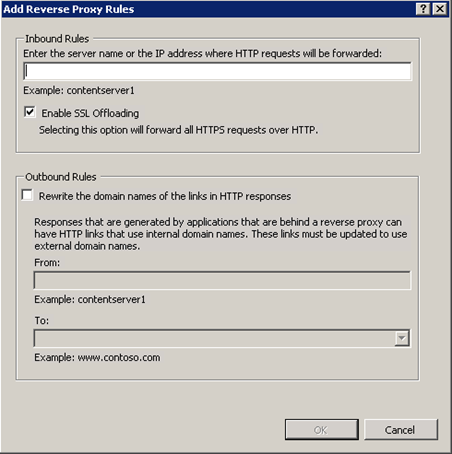
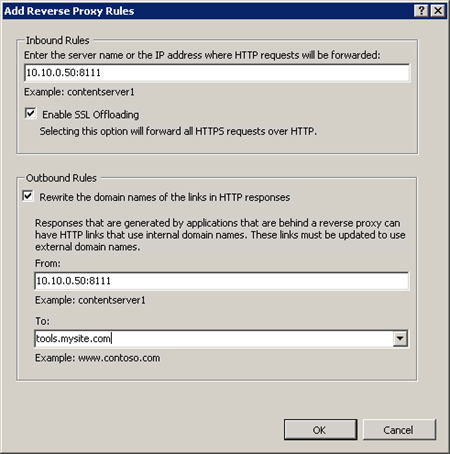
The next and final step of the template asks a few questions.
The first textbox asks the name of the internal web server. In our example, it’s 10.10.0.50:8111. This can be any URL, including a subfolder like internal.mysite.com/blog. Don’t include the http or https here. The template assumes that it’s not entered.
You can choose whether to perform SSL Offloading or not. If you leave this checked then all requests to the internal server will be over HTTP regardless of the original web request. This can help with performance and SSL bindings if all requests are within a trusted network. If the network path between the two web servers is not completely trusted and safe then uncheck this.
Next, the template enables you to create an outbound rule. This is used to rewrite links in the page to look like your public domain name rather than the internal domain name. Outbound rules have a lot of CPU overhead because the entire web content needs to be parsed and updated. However, if you need it, then it’s well worth the extra CPU hit on the web server.
If you check the “Rewrite the domain names of the links in HTTP responses” checkbox then the From textbox will be filled in with what you entered for the inbound rule. You can enter your friendly public URL for the outbound rule. This will essentially replace any reference to 10.10.0.50:8111 (or whatever you enter) with tools.mysite.com in all <a>, <form>, and <img> tags on your site.
That’s it! Well, there is a lot more that you can do, this but will give you the base configuration. You can now visit www.mysite.com on your public web server and it will serve up the site from your internal web server.
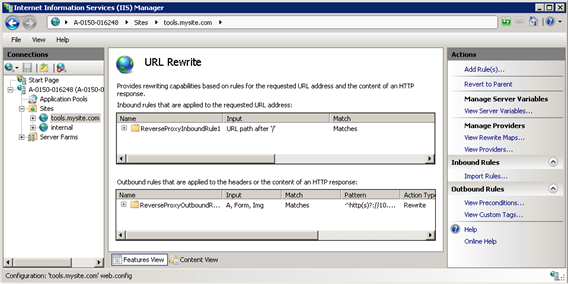
You should see two rules show up; one inbound and one outbound. You can edit these, add conditions, and tweak them further as needed.
One common issue that can occur without outbound rules has to do with compression. If you run into errors with the new proxied site, try turning off compression to confirm if that’s the issue. Here’s a link with details on how to deal with compression and outbound rules.
I hope this was helpful to get started and to see how easy it is to create a simple reverse proxy using URL Rewrite for IIS.
© ASP.net Weblogs or respective owner

