Turn A Flash Drive Into a Portable Web Server
Posted
by Matthew Guay
on How to geek
See other posts from How to geek
or by Matthew Guay
Published on Fri, 07 May 2010 12:00:00 +0000
Indexed on
2010/05/07
12:19 UTC
Read the original article
Hit count: 997
Portable applications are very useful for getting work done on the go, but how about portable servers? Here’s how you can turn your flash drive into a portable web server.
Getting Started
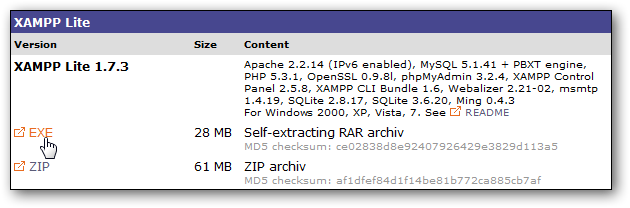
To put a full web server on our flash drive, we’re going to use XAMPP Lite. This lightweight, preconfigured server includes recent versions of Apache, MySQL, and PHP so you can run most websites and webapps directly from it. You could use the full XAMPP, which includes more features such as a FileZilla FTP server and OpenSSL, but for most purposes, the light version is plenty for a portable server.
Download the latest version of XAMPP Lite (link below). In this tutorial, we used the self-extracting EXE version; you could choose the ZIP file and extract the files yourself, but we found it easier to use the executable.
Run the installer, and click Browse choose where to install your server.

Select your flash drive, or a folder in it, and click Ok. Make sure your flash drive has at least 250MB of available storage space. XAMPP will create an xampplite folder and store all the files in it during the installation.

Click Install, and all of the files will be extracted to your flash drive. This may take a few moments depending on your flash drive’s speed.

When the extraction process is finished, a Command Prompt window will open to finish the installation. The first prompt will ask if you want to add shortcuts to the start menu and desktop; enter “n” since we don’t want to create start menu links to our portable server.

Now enter “y” to configure XAMPP’s directories automatically.

Finally, enter “y” to make XAMPP fully portable. It will set up the servers to run without specific drive letters so your server will run from any computer.

XAMPP will finalize your changes; press Enter when everything is completed.

Setup will automatically launch the command line version of XAMPP. On first run, confirm that your time zone is correct.

And that’s it! You can now run XAMPP’s control panel by entering 1, or you can exit and run XAMPP from any other computer with your flash drive.

To complete your portable webserver kit, you may want to install Portable Firefox or Iron Browser on your flash drive so you always have your favorite browser ready to use.
Running your portable server
Using your portable server is very simple. Open the xampplite folder on your flash drive and launch xampp-control.exe.

Click Start beside Apache and MySql to get your webserver running.
Please note: Do not check the Svc box, as this will run the server as a Windows service. To keep XAMPP portable, you do not want it running as a service!

Windows Firewall may prompt you that it blocked the server; click Allow access to let your server run.

Once they’re running, you can click Admin to open the default XAMPP admin page running from your local webserver. Or, you can view it by browsing to http://localhost/ or http://127.0.0.1/ in your browser.

If everything is working correctly, you should see this page in your browser. Choose your default language…

And then you’ll see the default XAMPP admin page.

Click the Status link on the left sidebar to make sure everything is running correctly.

If you click the Admin button for MySql in the XAMPP Control Panel, it will open phpMyAdmin in your default browser. Alternately, you can open the MySql admin page by entering http://localhost/phpmyadmin/ or http://127.0.0.1/phpmyadmin/ in your favorite browser.

Now you can add your own webpages to your webserver. Save all of your web files in the \xampplight\htdocs\ folder on your flash drive.

Install WordPress in your portable server
Since XAMPP Lite includes MySql and PHP, you can even run webapps such as WordPress, the popular CMS and blogging platform. Download WordPress (link below), and extract the files to the \xampplite\htdocs folder on your flash drive.

Now all of the WordPress files are stored in \xampplite\htdocs\wordpress on your flash drive.

We still need to setup WordPress on our portable server. Open your MySql admin page http://localhost/phpmyadmin/ to create a new database for WordPress. Enter a name for your database in the “Create new database” box, and click Create.

Click the Privileges tab on the top, and the select “Add a new User”.

Enter a username and password for the database, and then click the Go button on the bottom of the page.

Using WordPress
Now, in your browser, enter http://localhost/wordpress/wp-admin/install.php. Click Create a Configuration File to continue.

Make sure you have your Database name, username, and password we created previously, and click “Let’s Go!”

Enter your WordPress database name, username, and password, leave the other two entries as default, and click Submit.

You should now have the database all ready to go. Click “Run the install” to finish installing WordPress.

Enter a title, username, and password for your test blog, as well as your email address, and then click “Install WordPress”.

You now have a portable install of WordPress. Click “Log In” to access your WordPress admin page. Enter your username and password, and click Log In.

Here you can add pages, posts, themes, extensions, and anything else just like you would on a normal WordPress site. This is a great way to experiment with WordPress without messing up your real website.

You can view your portable WordPress site by entering http://localhost/wordpress/ in your address bar.

Closing your server
When you’re done running your test server, click the Stop button on each of the services and then click the Exit button in the XAMPP control panel. If you press the exit button on the top of the window, it will just minimize the control panel to the tray.

Alternately, you can shutdown your server by running xampp_stop.exe from your xampplite folder.

Conclusion
XAMPP Lite gives you a great way to run a full webserver directly from your flash drive. Now, anywhere you go, you can test and tweak your webpages and webapps from any Windows computer.
Links

| Similar Articles | Productive Geek Tips |
| Latest Software Reviews | Tinyhacker Random Tips |
© How to geek or respective owner